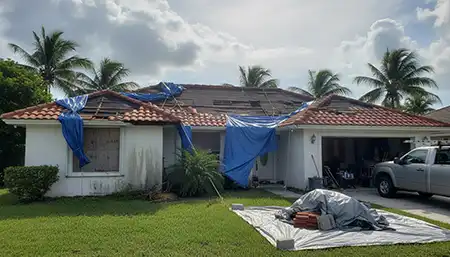
Southwest Florida roofs take a beating every storm season, and most of the serious damage starts small and out of sight. Understanding what actually happens on your roof and acting quickly when you see it are among the best ways to protect both your property and your peace of mind.
Why SWFL Roofs Are So Vulnerable in Storm Season
Along the SWFL coast, roofs live in a mix of salt‑laden air, regular thunderstorms, strong sea breezes, and the very real threat of tropical storms and hurricanes. On top of that, intense sun and UV bake shingles, tiles, sealants, and coatings almost every day of the year. By the time a named storm appears on the radar, many roofs already have metal and fasteners beginning to corrode, shingles and sealants turned brittle by UV exposure, and tile systems stressed by years of heat and prior wind events.
Storm damage often builds on those existing weaknesses. A fastener that was “just a little rusty” or a shingle seal strip that was “mostly holding” can fail in one bad night of wind and rain. That’s why catching issues early—before storm season or right after a smaller event—is critical if you want to avoid costly surprises.
How Salt Air Sets the Stage for Storm Damage
Salt air and salt spray are constant players near the Gulf. Fine salt particles settle on your roof and slowly:
- Corrode fasteners, flashing, drip edges, and metal valleys
- Break down protective coatings on metal roofs and trim
- Create rust streaks and silently weaken attachment points
After a strong storm, that groundwork shows up as:
- Rusted fasteners that actually pull out under wind uplift
- Loose or rattling metal panels or edge trim
- Flashing that lifts, buckles, or tears because the metal was already thin and compromised
From the driveway, the roof might look fine. From above, you often see rusted screws backing out of metal, edges starting to curl or gap, and thin, chalky coatings that no longer protect the metal underneath. The urgency here is simple: salt‑weakened components can go from “cosmetic” to “leaking into your attic” in a single storm.
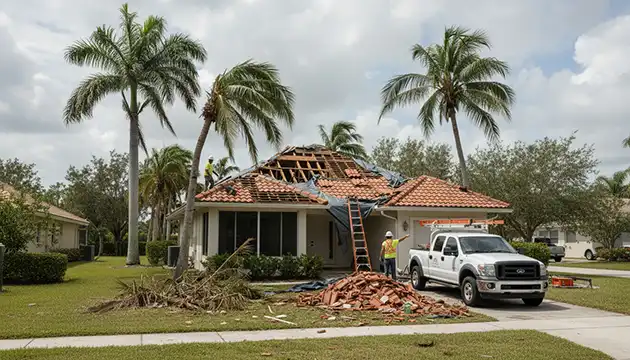
Wind Exposure: The “Invisible” Damage We See From Above
Every storm season brings wind‑related damage patterns that are easy to miss from the ground.
For shingle roofs, we commonly see:
- Lifted or creased tabs where the shingle has bent but not blown off
- Missing shingles along edges, ridges, and around roof‑to‑wall transitions
- Nail pops and disturbed seal strips mean the shingle is no longer properly bonded
For tile roofs, typical issues are:
- Cracked or displaced tiles, especially along ridges and eaves
- Broken ridge caps where wind and debris hit hardest
- Exposed underlayment in areas where tiles have shifted or fractured
For metal roofs, we often find:
- Lifted seams or edges at eaves and ridgelines
- Loose ridge caps and trim pieces that have started to move
- Small gaps at overlaps and penetrations where the sealant has let go
A lot of this damage is subtle. Tabs can be unsealed but still lie roughly flat; tiles can appear aligned from the yard but be cracked or shifted just enough to expose the underlayment. After one strong tropical system, for example, a drone sweep over a coastal block revealed widespread cracked shingles and multiple displaced tiles that would not be noticed from street level. The owners who jumped on those issues avoided much larger leaks in the next round of storms.
Roof Materials: How Each Type Typically Fails After Storms
Different roof types fail in different ways, and knowing what’s typical helps you decide what to check first.
Concrete/clay tile roofs
Common post‑storm issues:
- Cracked corners and fractured tiles from wind‑driven debris
- Slipped tiles that expose the underlayment in small patches
- Broken or missing ridge and hip tiles at the highest, most exposed points
Delaying repairs is risky. Once the underlayment is exposed, UV and wind quickly degrade it, and water can find pathways beneath the tile system long before any stain appears inside the home.
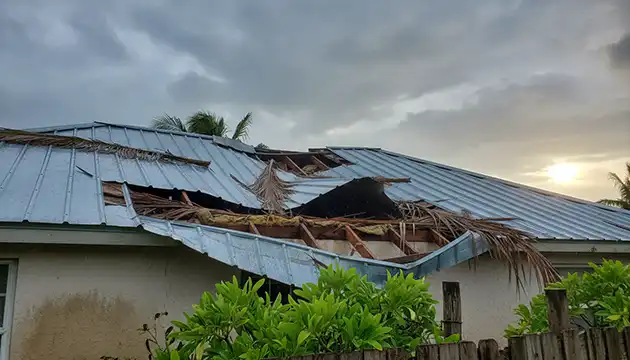
Metal roofs (standing seam, 5V, etc.)
Common post‑storm issues:
- Lifted or slightly deformed panels at eaves, ridges, and along edges
- Fasteners backing out in older exposed‑fastener systems
- Compromised sealant at seams, end laps, and penetrations
Storms plus salt air make a bad combination. Even small panel movement can open up rusty fastener holes and seam gaps, allowing water in and accelerating corrosion around those points.
Architectural shingle roofs
Common post‑storm issues:
- Creased or lifted shingles that have effectively “failed,” even if they haven’t blown off yet
- Granule loss from intense wind and rain, especially in certain slopes or zones
- Shingles pulled at corners and edges, particularly near ridges and eaves
These issues are hard to see from the ground because the roof still appears mostly covered. Insurers often treat significant creasing and broken seal strips as serious damage, because those shingles are no longer doing their job in future storms.
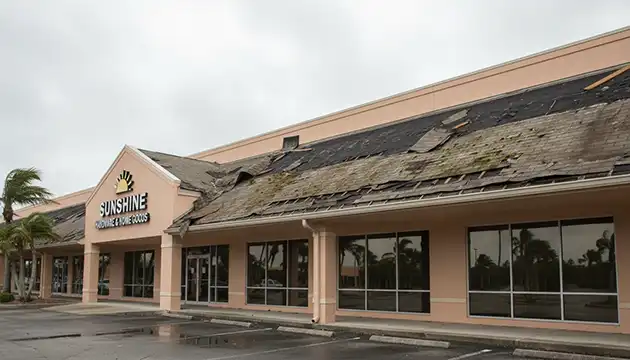
Flat roofs (TPO, modified bitumen, etc.)
Common post‑storm issues:
- New ponding areas from slight deck or insulation movement
- Open seams or lifted edges where wind has caught the membrane
- Blisters or wrinkles caused by trapped moisture under the surface
Even small seam openings can allow water into multi‑unit buildings and common areas, causing widespread interior damage. That’s why flat roofs deserve special attention after any big wind or rain event.
Urgency and Trust: Why Timing Matters Right After a Storm
Acting quickly after storms isn’t just about the roof—it’s about everything under it and everyone depending on you.
Timely inspections help:
- Protect interiors and common areas before the next rain pushes water farther in
- Preserve relationships with residents and tenants who expect a proactive response
- Maintain credibility with insurers by documenting damage promptly and accurately
When inspections are delayed, small openings often become major leaks within a few weeks of daily storms. That’s when you start dealing with soaked insulation, damaged drywall, and mold problems that drive repair costs through the roof. Insurers may also question late‑reported damage, especially if it appears something could have been minimized with quicker action.
A fast, structured inspection, especially with good aerial coverage, helps separate true storm damage from old issues and tells you which roofs and buildings need immediate attention versus those that can be monitored over time.
Why Drone Inspections Are So Effective After SWFL Storms
From a homeowner or manager’s perspective, drones solve three big problems at once.
- Safety: They inspect steep, wet, or damaged roofs without sending workers up ladders on unstable surfaces.
- Coverage: They can quickly scan an entire neighborhood, HOA, or condo campus, rather than climbing one roof at a time.
- Clarity: They provide clear, zoomable images of:
- Creased and lifted shingles
- Cracked or displaced tiles
- Lifted metal edges and trim
- Ponding and seam issues on flat roofs
During busy storm seasons, contractors are stretched thin. When you bring them detailed drone images and a prioritized list of issues, you:
- Get triage done faster
- Help roofers and adjusters focus on the worst damage first
- Build trust with residents by showing that assessments are being handled systematically, not randomly
That combination of safety, speed, and documentation is exactly what storm season demands.
What a Good Post‑Storm Roof Check Should Include
Whether you hire a drone pilot, a roofer, or both, a professional post‑storm roof check should give you more than “looks okay” or “needs work.” You should expect:
- Clear, dated photos of all slopes, ridges, and roof edges
- Close‑ups of any suspected wind, debris, or impact damage
- Notes tied to specific locations, such as:
- “Lifted shingles along rear eave”
- “Cracked tile at front right hip”
- “New ponding area near rooftop unit on Building B”
And you should receive a simple, prioritized summary, using language like:
- “Monitor” (watch over time)
- “Repair soon.”
- “Urgent before next storm.”
This level of detail makes it much easier to:
- Talk with roofers and adjusters about scope and pricing
- Decide where to spend money first when budgets are tight
- Build a record you can refer back to for future storms and insurance renewals
Preparing for the Next Storm: Preventive Steps Between Events
Between major storms, a few targeted steps go a long way:
- Address known lifted shingles, cracked tiles, loose metal edges, and open seams before peak season hits.
- Keep an eye on known weak areas, like near ridges, around rooftop units, and along older roof transitions.
- On coastal properties, pay special attention to:
- Metal edges and fasteners showing rust or staining
- Older shingle roofs with obvious granule loss or patchy color
A simple, effective rhythm looks like this:
- Baseline inspection before storm season
- Focused post‑storm inspections after significant events
- Follow‑up checks on roofs with marginal or repaired damage to make sure fixes hold
That rhythm helps you stay ahead of problems instead of always playing catch‑up.
Closing: Reassurance and Call to Smart Action
In Southwest Florida, storms, salt air, and UV make roof damage common—but often hidden in the early stages. When you know how each roof type tends to fail and where to look after a storm, you’re far less likely to be blindsided by the next round of weather.
You don’t need to become a roofing expert to stay protected. What you do need is a habit of quick, well‑documented inspections, especially from above whenever storms roll through. That one habit protects the building, the budget, and the trust your residents or tenants place in you throughout storm season.